Export
The export feature allows exporting objects from the current study to an external file. The following sections show the different ways to export objects.
Export PartSet
To export the full study in SHAPER native format (*.shaper) select in the Main Menu File -> Export -> Part Set… item.
The Export file dialog will be opened:

Dialog box for export to SHAPER native format
Specify file name and press Save button to export the file. Cancel button cancels the operation.
TUI Command:
It is not possible to export the entire PartSet into a single file using the Python interface, but the contents of a Shaper session can be saved into a directory:
-
ModelAPI_Session.save(FolderNameString, FilesList)¶ - Parameters
string – The folder name to save in
list – A list of stored files (output)
Result
The result of the operation is several files saved in the specified directory.
See Also a sample TUI Script of Save Session operation.
Export Part
It allows to export the specified results including the sequence of all operations which affect the selected objects.
To export results in binary format (*.shaperpart) select in the Main Menu File -> Export -> Part… item.
The following property panel will be opened:

Export Part property panel
The file name and path can be defined in Export file field by direct input or browsing with ‘…’ button, which opens Export file dialog box:

Dialog box to export part of the model
Selection list in the property panel contains a list of exported objects which can be selected in a viewer or object browser. In case of the list is empty, all active results in the current Part will be exported. If the PartSet is active, only results (construction elements) of this PartSet may be selected for the export, but not results of Parts.
Note: It is forbidden to export features that include references to external elements other than default elements (origin or main axes and planes).
Apply button exports the file.
Cancel button cancels the operation.
TUI Command:
-
model.exportPart(Part_doc, FileNameString, ObjectsList)¶ - Parameters
part – The current part object
string – The file name
list – A list of exporting objects, if necessary
Note: You can also pass the entire PartSet as the first argument to export features created in it (those that are at global level, not within parts).
Result
The Result of operation is an exported file.
See Also a sample TUI Script of Export File operation.
Export to CAD format
It is possible to export objects to files in the following CAD-neutral formats: BREP, STEP, IGES, XAO, STL. To export objects to a file select in the Main Menu File -> Export -> To CAD formats… item.
The following property panel will be opened:

Export property panel
In this panel, it is necessary to select desirable format of export file. It can be ‘BREP, STEP, IGES, GLTF’ , ‘XAO’ or ‘STL’ .
Export to BREP, STEP, IGES, GLTF
In case of first choice the format of exported file will be defined according to file extension. The file name and path can be defined in Export file field by direct input or browsing with ‘…’ button, which opens Export file dialog box:

Dialog box to export in CAD-neutral format
Selection list in the property panel contains a list of exported objects which can be selected in a viewer or object browser.
Apply button exports the file.
Cancel button cancels the operation.
GLTF
GLTF (GL Transmission Format) is a file format for 3D scenes and models using the JSON standard. It supports two formats: .gltf (JSON) and .glb (binary).
For the GLTF format, triangulation is required. This is usually computed during the visualization of the result, but if result was not displayed (SHAPER not active), triangulation will be computed manually using predefined value. In this case triangulation can be different with case, when it computed automatically.
TUI Command:
-
model.exportToFile(Part_doc, FileNameString, ObjectsList)¶ - Parameters
part – The current part object
string – The file name
list – A list of exporting objects
Result
The Result of operation is an exported file.
See Also a sample TUI Script of Export File operation.
Export to XAO
In this case, the following property panel will be opened:
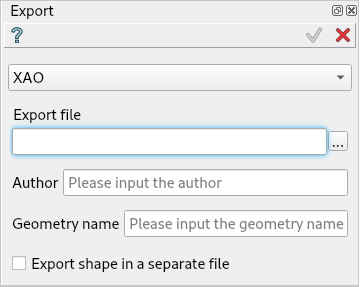
Dialog box to export in XAO format
The file name and path can be defined in Export file field by direct input or browsing with ‘…’ button, which opens Export file dialog box
Note: For XAO format, selection list is not available, the whole part is exported.
Author Author name, empty by default
Geometry name Geometry name, empty by default
Export shape in a separate file if checked, shape will be exported in a separate BREP file with path = <XAO file name> + “.brep”
Apply button exports the file.
Cancel button cancels the operation.
TUI Command:
-
model.exportToXAO(Part_doc, FileNameString, Author='', GeometryName='', ShapeFile='')
-
model.exportToXAO(Part_doc, FileNameString, Object, Author='', GeometryName='', ShapeFile='')¶ - Parameters
part – The current part object
string – The file name
object – An exporting object, if necessary
string – The name of the author, empty by default
string – The name for the shape processed in GEOMETRY module, empty by default
string – The shape file name. If not empty, shape data will be stored in a separate BREP file, given by this parameter
-
aBuffer = model.exportToXAOMem(Part_doc, Object, Author="", GeometryName="") This function enables passing data in XAO format from SHAPER to GEOM through a memory buffer (bytes array), without creation of real file on disk.
- Parameters
object – The object to export
string – The name of the author, empty by default
string – The name for the shape processed in GEOMETRY module, empty by default
Result
The Result of operation is an exported XAO file.
See Also a sample TUI Script of Export XAO File operation.
Export to STL
In this case, the following property panel will be opened:

Dialog box to export in STL format
The file name and path can be defined in Export file field by direct input or browsing with ‘…’ button, which opens Export file dialog box.
Object field contains an exported object which can be selected in a viewer or object browser.
Deflection (Relative or Absolute) has to be chosen and defined in the corresponding field as well as the File type which can defined as Binary or as ASCII.
Apply button exports the file.
Cancel button cancels the operation.
TUI Command:
-
model.exportToSTL(Part_doc, FileNameString, selectedShape, relative, absolute, isRelative, isASCII)¶ - Parameters
part – The current part object
string – The file name
object – An exporting object
real – value of the relative deflection
real – value of the absolute deflection
boolean – indicate if use deflection relative
boolean – indicate if the file is in ASCII type
Result
The Result of operation is an exported STL file.
See Also a sample TUI Script of Export STL File operation.